As an Affiliate, We may earn a commission that doesn't cost you extra from qualifying purchases using links in this post. It helps keeps this blog running.
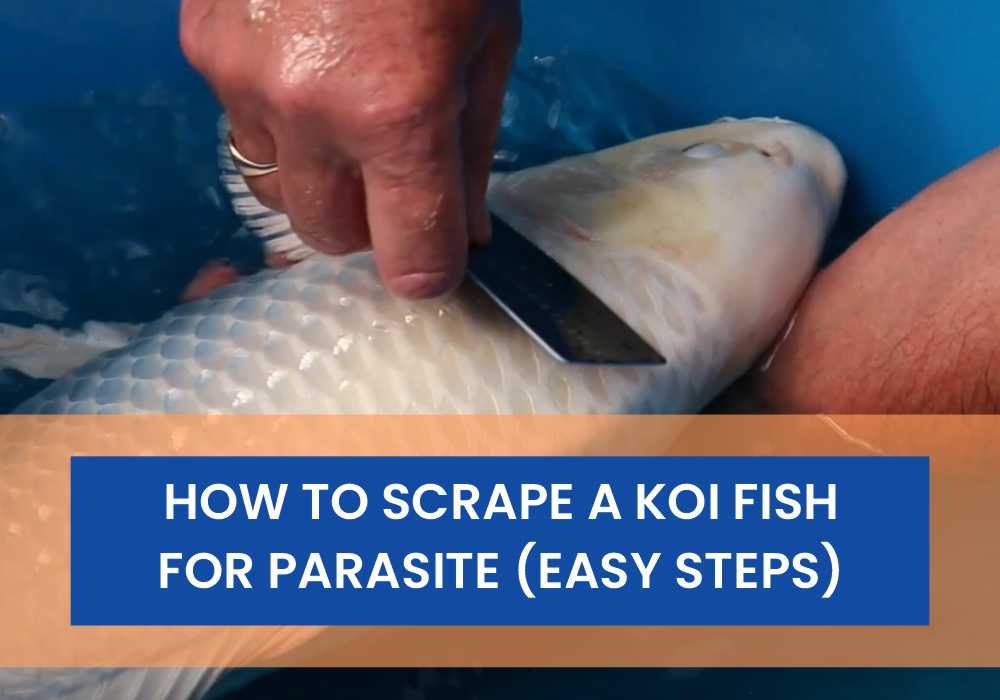
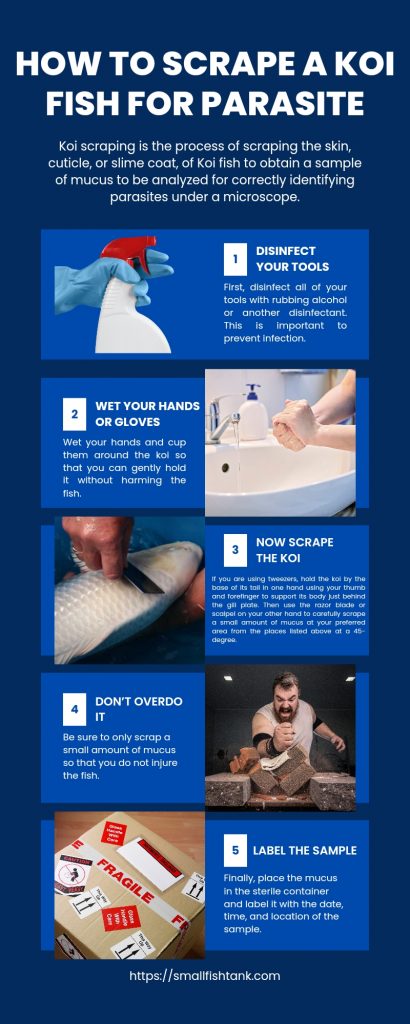
Koi scraping is the process of scraping the skin, cuticle, or slime coat, of Koi fish to obtain a sample of mucus to be analyzed for correctly identifying parasites under a microscope. The koi keeper does koi scraping to inspect the health of the koi and determine if parasites are present. If parasites are found, treatment can be administered to the koi accordingly.
Koi scraping should be done every few weeks to keep a close eye on the health of your koi fish. It only takes a few minutes to scrape each fish, and it is a relatively easy process. Koi scraping is an important part of regular koi care and should not be neglected.
Where Can I Scrape A Koi Fish?

It’s important to know where to scrape your Koi fish so that you can get an accurate sample.
Below are a few different places you can scrape a koi fish:
- The side of the fish, just behind the gill plate
- The bottom of the fish, near the vent
- The top of the fish, near the dorsal fin
- Along the lateral line
How Do I Scrape A Koi Fish?
If you have never performed koi scraping before, below are the first four few things you need to know:
- First, always use clean equipment.
- Sterilize all tools before using them on your koi.
- Second, be gentle when handling the fish.
- Do not put too much pressure on the skin or scales while scraping, as this could injure the fish.
Below are the tools needed to scrape your Koi fish (Koi scraping kit):
- A clean, sterile container like a cup or bowl to collect the mucus sample
- A clean, sterile scalpel or razor blade. You can get one here
- Rubbing alcohol or another disinfectant to sterilize the tools.
- Tweezers. You can get one here
- Sterile gloves. You can get one here
Steps On How To Scrape A Koi Fish

To safely scrape your koi fish and acquire samples for test, follow the steps below:
Total Time: 4 minutes
-
Disinfect Your Tools
First, disinfect all of your tools with rubbing alcohol or another disinfectant. This is important to prevent infection.
-
Wet Your Hands or Gloves
Wet your hands and cup them around the koi so that you can gently hold it without harming the fish. You can also use gloves if you are concerned about coming into contact with the fish mucus.
-
Now Scrape The Koi

If you are using tweezers, hold the koi by the base of its tail in one hand using your thumb and forefinger to support its body just behind the gill plate. Then use the razor blade or scalpel on your other hand to carefully scrape a small amount of mucus at your preferred area from the places listed above at a 45-degree.
-
Don’t Overdo it

Be sure to only scrap a small amount of mucus so that you do not injure the fish.
-
Label the Sample

Finally, place the mucus in the sterile container and label it with the date, time, and location of the sample.
Repeat this process for each fish you wish to scrape. Once you have collected all of the samples, you can then proceed to microscopy analysis.
What Are Some Common Parasites That Can Be Found During Koi Scraping?
Some common parasites that can be found during koi scraping include:
- Flukes
- Protozoans
- Ciliates
- Nematodes
- Trematodes
What To Do With The Mucus Sample After Koi Scraping
After you have collected the mucus sample, you will need to take it under a microscope to analyze and see if any parasites are present in the sample. This can be done by your local veterinarian or fish store. If parasites are found and identified in the sample, treatment can be administered to the koi accordingly.
The OMAX 40X-2000X LED Binocular Compound Lab Microscope is a great choice with up to 2000X magnification.
Koi scraping is an important part of regular koi care and should not be neglected. By performing koi scraping on a regular basis, you can keep a close eye on the health of your koi fish and take prompt action if any problems are found to ensure that they remain parasite-free.
Most koi parasites are not harmful to humans, but there are a few that can be transmitted to people if they come in contact with the fish’s blood or skin. It is important to wash your hands thoroughly after handling koi that have parasites.
With a little practice, koi scraping is easy to do and only takes a few minutes. So be sure to add it to your regular koi care routine!
How Do You Scrape Gill Flukes?
There are a few different ways to scrape gill flukes, depending on the severity of the infestation. If the infestation is mild, you can simply use a soft brush to remove the flukes from the gills. If the infestation is more severe, you may need to use a sharp object like a scalpel to scrape the flukes off. Whichever method you use, be sure to disinfect the area afterward to prevent further infection.
To scrape gill flukes, you will need a sharp knife or scalpel and then;
1) Lift The Flap of The Fish’s Skin
Gently lift the flap of skin that covers the gills to remove any excess mucus or debris from the affected area.
2) Insert The Blade Into The Skin
Next, gently insert the blade into the skin at the base of the fluke and carefully slice it away.
3) Repeat Process
Repeat this process until all of the flukes have been removed.
4) Rinse With Clean Water
Finally, rinse the area with clean water to remove any remaining bacteria or parasites.

I’m Akin Bouchard. Even though I now own several different fish species, I first became a koi pond owner because I loved these creatures and wanted to turn my passion into something more serious. I take pride in my collection of koi fish and love sharing my knowledge with others interested in these beautiful creatures.
A Comprehensive Guide to Training Your Fish to Perform Amazing Tricks Feats